26
Designed in FreeCAD and printed on a custom Ender-3 V2. A couple more details / photos in the Mastodon thread.
Finally, a comm for that one user who hand-makes longbows. This ones for you, comrade.
Designed in FreeCAD and printed on a custom Ender-3 V2. A couple more details / photos in the Mastodon thread.
heyyy friends 
It's been longer than I wanted it to be, I've had a hard time lately, everything from work stress to coming out to my highly conservative family to some particularly nasty dysphoria, had me cruise right into a nice little light to moderate menty b - I'm fine, it was a growth opportunity, sometimes you just indulge these things and get in your car and drive with the music up real loud and hop out somewhere you can watch the sunset and you cry alone for a while and you savor it and you come out of it cleansed. I'm good. Being a girl is hard. Still figuring it out. <3
This is a light update in terms of work I've accomplished but it's a big update in terms of how this project becomes something more community related. the title of this post is actually a double entendre, you see - not only do I have issues, but the sphynx project also has an issue tracker. 
Issue tracker for sphynx (the electronics): https://todo.sr.ht/~_410bdf/sphynx?search=status%3Aany
Issue tracker for sphynx-site (the website, both content and style): https://todo.sr.ht/~_410bdf/sphynx-site?search=status%3Aany
This changes a lot. I've been stressing with each post about ways I can ask y'all for help, because I 1) want to take some of the load off of myself, and more importantly, 2) turn this into a truly community project, where people all across the world leave their mark and have this be something we do as together as we can. Now that I have an issue tracker, I can start unloading my brain asynchronously from these posts, providing all the information in a neat compartmentalized fashion per issue, and teeing things up for community members to take on. It also serves as a great work journal, I still make, comment on, and close issues that I work alone, so it's a good place to check in to see that I'm still doing things (even though it's been a minute  )
)
I've done some electrical work since last post too, pretty much just bug fixing and improvements from RC1, and if you'd like to read about it, it's all (albeit very tersely) captured in the issues! Go dig around and have fun!
The site is a little fresher too! Just a bit, it's still not inhabitable yet, but we're getting there. https://sphynx.diy Huge shoutout to @Edie@hexbear.net, it put in a really a lot of work and sent me more than a few patches, including fixing some bugs I had spent kind of not a little time on, plus, of course, doing the entire original Jekyll port and the entire original CI pipeline. You're real for that, thank you 
OH! And message me on matrix??? @410bdf:matrix.org say hi! I love hearing from y'all! Or say hi here! Huge shoutout again to @Edie@hexbear.net for reaching out on Matrix and talking with me and hyping me up and talking about the project together with me!
Not much else, this is a quick one to let y'all know I'm still alive and to share out the issue tracker so I'm more confident to ask for help and have it be effective. As usual love y'all. I've been using RC1 and it still works but it's only getting better from here. Byeee 🫶
Hi comrades! I'm back! Sorry for the delay! I've been keeping busy, with this project, with work, and with getting familiar with a new town. This update is fun because it's actually entirely devoid of electrical engineering nerd shit! Since last update, I've focused on two things - getting the framework of a website together, and actually getting usage hours on the device so I can know how it handles, what it's missing, what it does well, etc. I'll break this update into those two sections.
I think I have about 5 hours in the device so far, with I'm guessing a couple thousand or so pulses. I've tested my face, eyebrows and beard, I've tested my hands, I've tested my arm, I've tested my leg, and I've tested my chest. The general routine is as follows:
Some areas are clearly not regrowing, others, it's too early to make a call, but I'm pretty confident that it'll be minimal, possibly even better than salon electrolysis, due to a number of advantages to self-work that I'm finding that I'd love to detail here. There are some cons too.
I also have some notes on equipment:
This isn't all inclusive, but I'm definitely happy to get thoughts down prior to starting work on the manual! which leads us to...
It's on jekyll now! We're finally ready to start hosting actual, real content there! So, so many thanks to @Edie@hexbear.net , who actually single-handedly ported the old single page splash screen to Jekyll and on top of that pushed out a bunch of fixes for my sloppy half-assed jekyll code. I really, really appreciate you, you're genuinely helping both to motivate me by both making indispensable contributions, and also just by being a person out there in the world doing this with me.
The appearance and organization are both super preliminary, and there's not any actual content, and the design is also very much a prototype. The important thing is that now I (or anyone else!) can just write markdown and have it reflected online in an easily readable and shareable format. Email patches are a great way to get both code and content on the page, I try to review them at least twice a week or so. Now that things are set up, it's extremely convenient to put content up. I think to pilot the website, I'm going to make a more formal tutorial for the pencil based probe to start. The one I made per @YearOfTheCommieDesktop@hexbear.net's instructions is still doing phenomenally, thank you for your research and development. Similar thanks for being a part of the project in a meaningful way and making this a team effort.
Come take a look! https://sphynx.diy
So the project is hitting a bit of a fork, where we finally have multiple parallel work streams at a time - the online manual needs to be designed/written, and the RC2 version of the PCB needs to be designed and ordered. I have a list of changes from working with the RC1 that I'll be rolling in, that'll be the next post. I'm also going to start using https://todo.sr.ht to track issues, both to keep myself organized and to publicly advertise what we need to get done in a neat encapsulated way. I'll have details for that up on an #8.5 post in a couple days. For now, honestly I feel bad for drastically overrunning my two week timeline and leaving y'all in the dark for so long, so this post is going up ASAP. I've been busier than usual and probably busier than I plan to be in the future, so I'm more optimistic for a timely #9 post, although that may be in three weeks and not two due to some plans of mine.
I love y'all. RC2 might be the release. We're just weeks away from other people benefiting from this project materially, it's just refinements from here. Thanks for the support, and you know the drill, stop by, say hi, ask questions if you want to understand things better, make suggestions, all of it. See ya next time. 

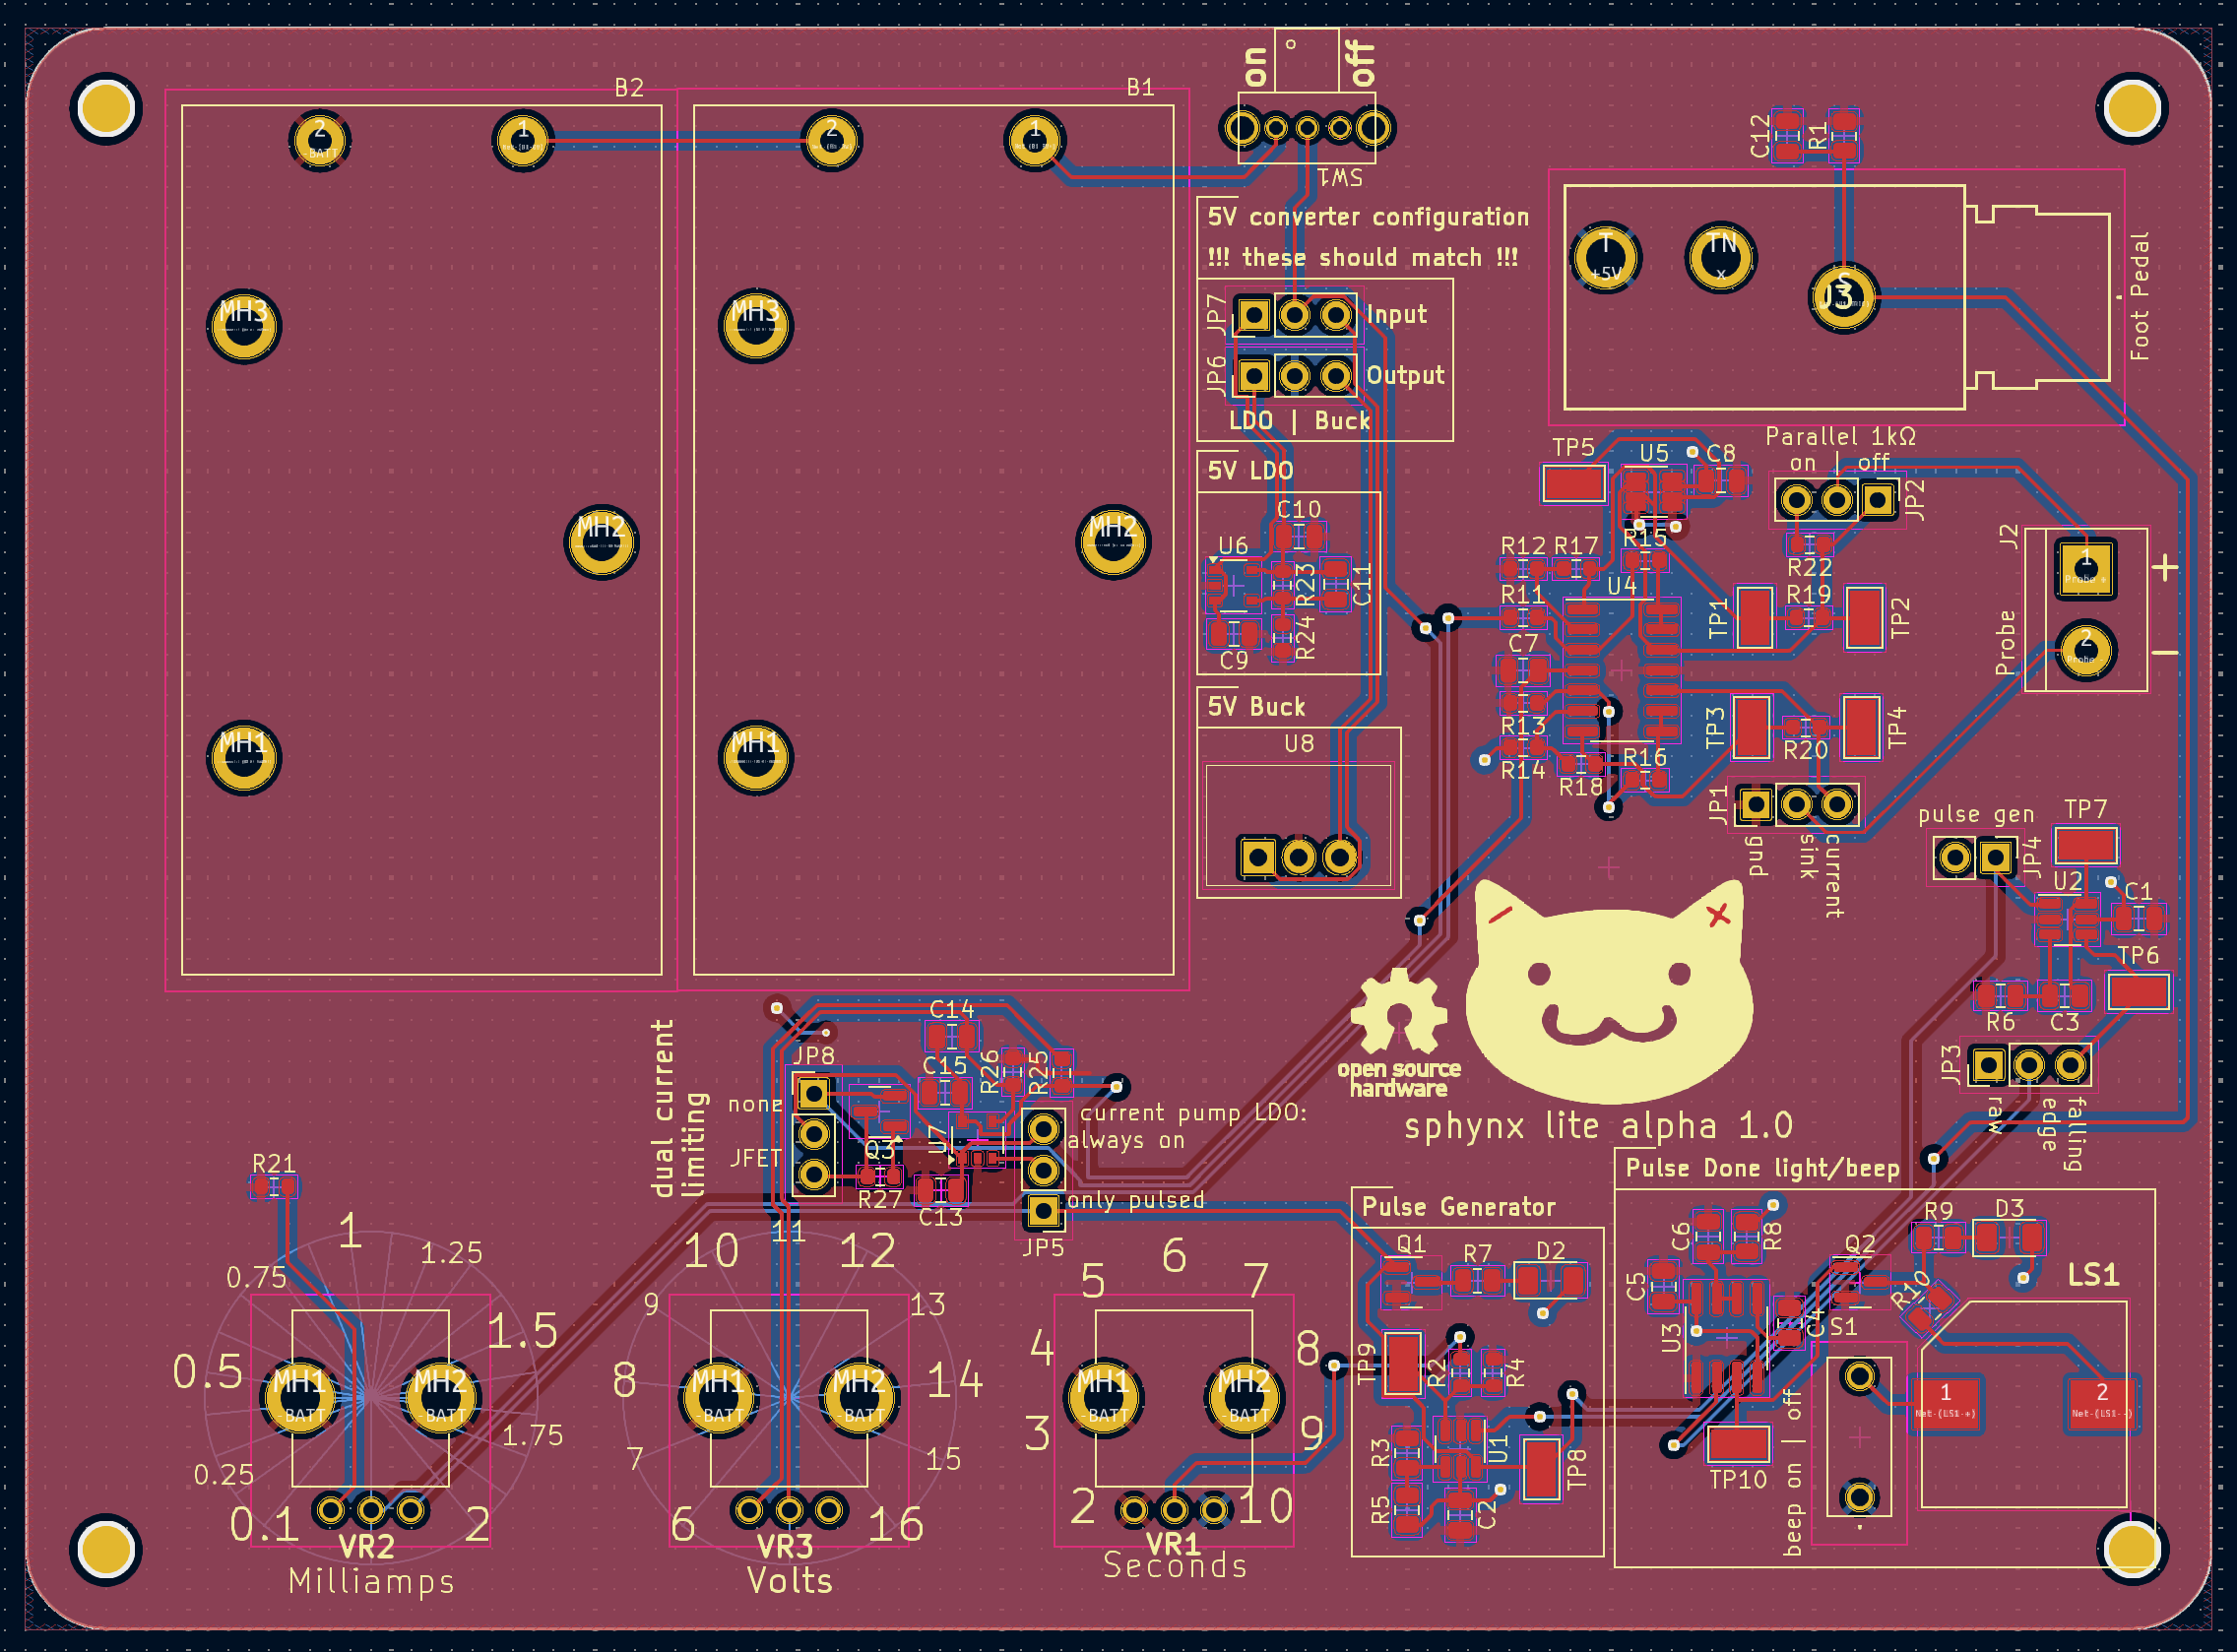
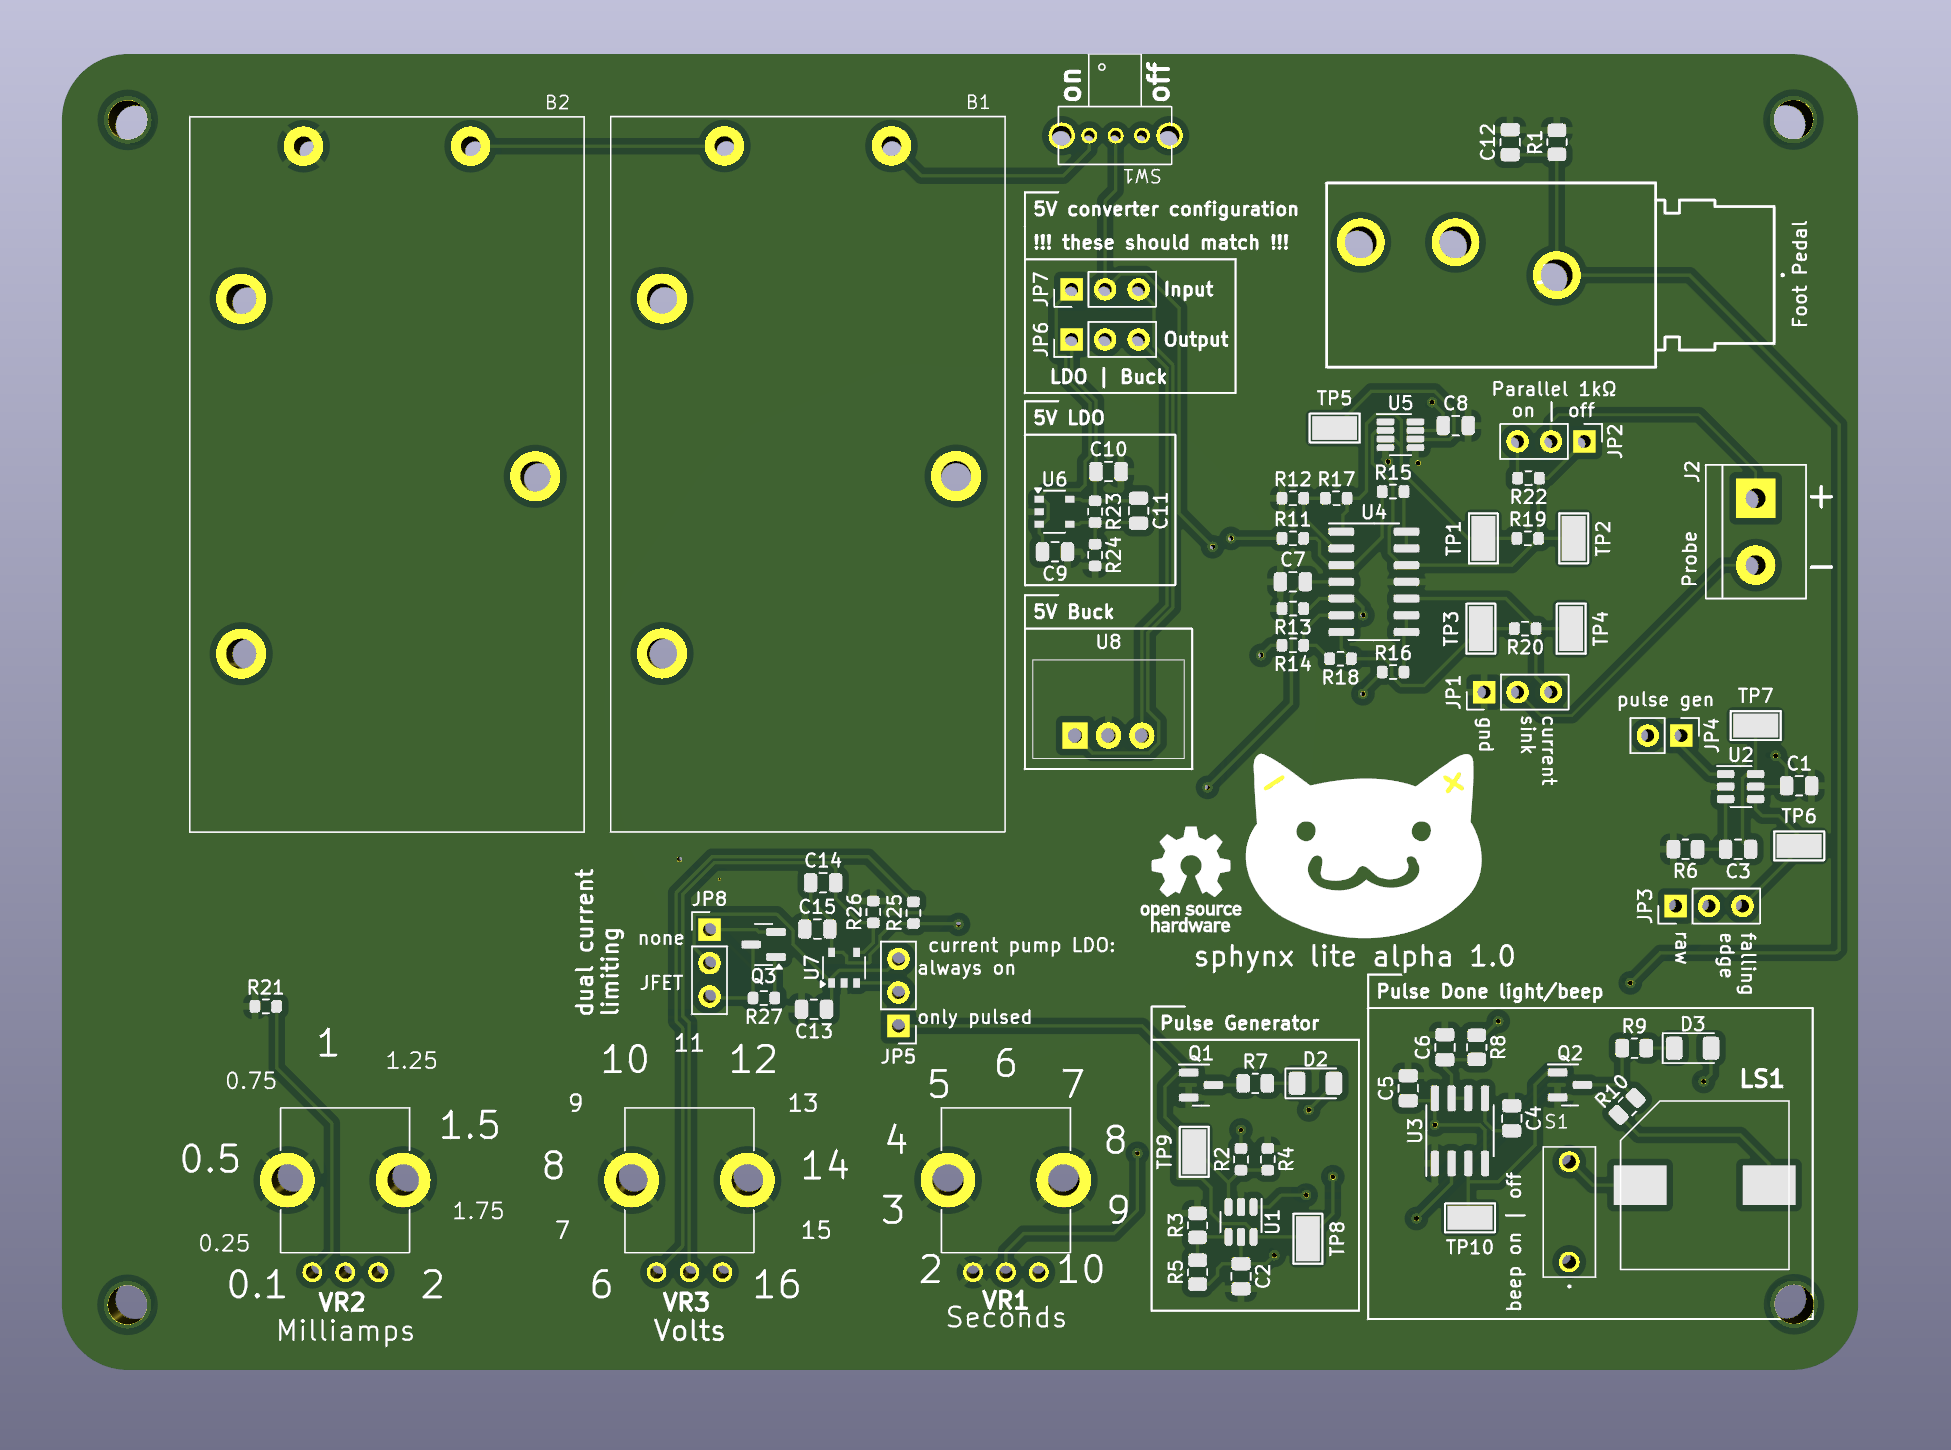
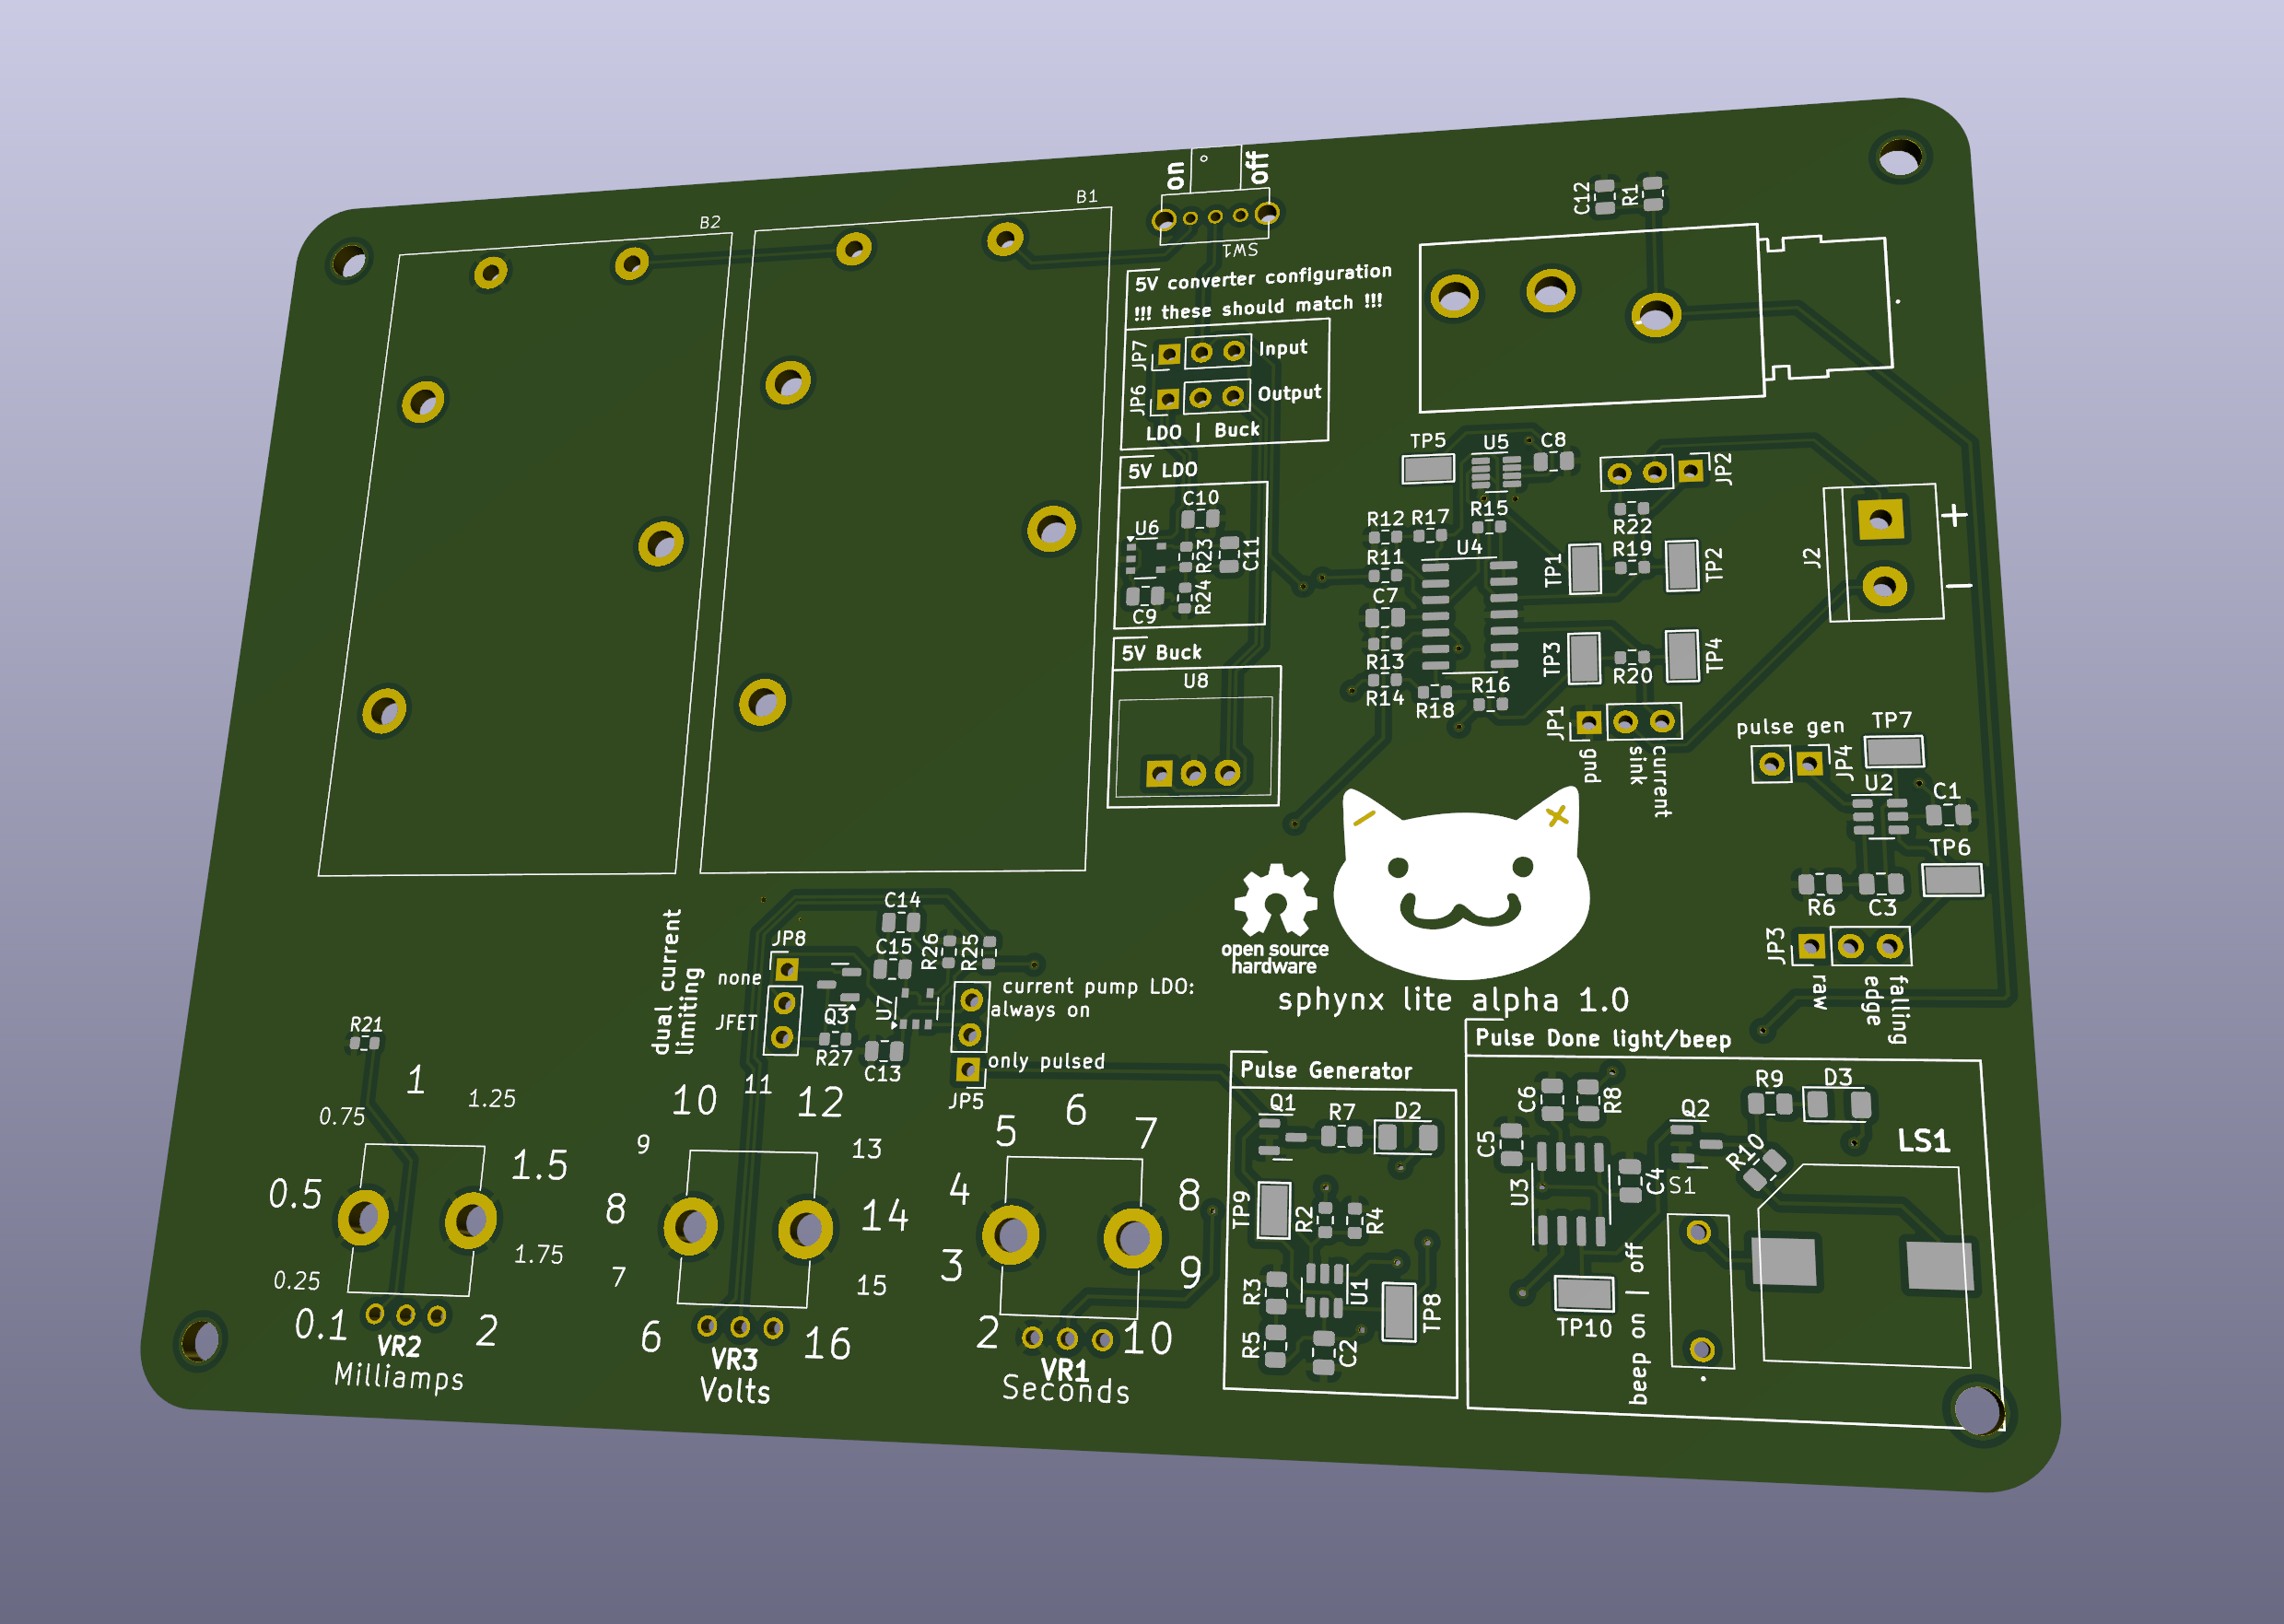
it's in and it's built and it FUCKING WORKS, at least like 80% of the way - I haven't fully put it through a full round of testing yet but every single functionality I've tested - including things that were first-time builds that I hadn't prototyped yet, like the adjustable LDO on the output and the double schmitt trigger falling edge detector, all seem to work! I even splurged a little bit and got some trans knob caps .

I don't know what to tell you, read 'em and weep. The board is built, you see it, it goes hard. Pretend my soldering isn't shitty and I cleaned the flux off. 
Full list of things that work:


 . It worked great for a few minutes and then I soldered in S1 and it stopped working.
I don't know if it has any new bugs when specifically connected to a human being. I suspect that if I were to try to use the current sink on the low side of the probe, which I'm bypassing right now, it'd be whacky - I never made an effort to resolve that bug, and I think I might just descope that to get this thing done at all. I'm already longing for a fresh start on some things that I think I can get by launching into the microcontroller-based version of this. There are already enough redundant safety measures in place for me to feel comfortable, although I'd really like to test the JFET current limiter, which I didn't populate because I couldn't source a good JFET and I also couldn't be assed to determine the correct resistor value. I'd really like either that or a current limiting diode on the high side of the amplifier before I call this done. That's going into the next rev. There are also some non-breaking bugs that I still need to design out, like for example I designed in 20K potentiometers for the current and time control, but Alps Alpine only makes 20K potentiometers in audio trim, meaning the knob angle isn't really one to one with the output. I need to replace those with different values. Other little things like that too.
I'm going to work with the board for a bit and see how it handles! I need to get some hands-on time with it to truly learn how it works, what it's missing, and what I need to change. I'm also kind of just looking to reap the benefits of this thing personally to be honest, I'm getting really tired of shaving 
(plus i'm meeting some girls who are kinda into this thing and might wanna go hour for hour on some mutual aid electrolysis time over comfort shows and snacks on the couch 
 )
)
I think the "alpha" model of releases was a mistake. Because of the nature of hardware development, I think I'm going to change to a "release candidate" model - it makes it clear that any RC board isn't ready to be used, and it allows me to promote any one at any time once I've designated it good enough. So, I'll begin work on RC2 once I'm deeply familiar with this board!
I'm also deeply neglecting the site, mainly @Edie's jekyll port that I really deeply truly appreciate and I never figured out how to apply the patch for. I'm sorry friend 💔 Can you work with me to get that patch applied? I tried to tackle it on a super low executive function day and I just made so little progress applying your patchset and I wanna have it up so bad but it was fighting me and I needed rot time and I quit trying after like twenty minutes 
There are kind of a few things actually! In no order of priority, with loose guesses at difficulty:
If any of these things sound like a thing you want to make an attempt at, let me know! I'll work with you to get you started.
sloppy post today, this is deeply not accessible for non-technical audiences and leaves a lot out, so please let me know if you want deeper explanation on anything and i'll add detail! I just wanted to make sure i got my post up to let you know I'M STILL FIGHTING BABY
i'm still very not settled with the move, and burnout is closing in with my job and my new trans social life, but I'm at equilibrium, I'm okay to keep spending the amount of time I am on this, but I wish I could be spending just a little more. Life is okay though. Great, even. 
As always, stop by, hang out, say hi, ask questions, tell me what you've been up to, design review me, however you'd like to be involved is good by me! I'll see you in the comments 🥰

hello comrades! It's been a minute! I'm back with my first tech update since upending my entire life and getting re-settled! Let's talk 
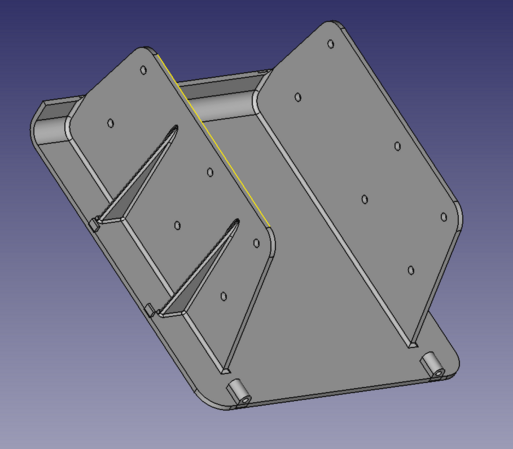
See for yourself, pictured is the first alpha of the Sphynx Lite. Schematics are on git, go check it out (and if you want to set up KiCAD to view or edit but aren't quite sure how, say so in the comments and me or someone else will help you out!)
Issuing guidance on the usage of these things is complicated. I'm always going to be a little apprehensive recommending that people use this, because I'm a very cautious person. For now, I think my official guidance is:
As it gets more mature and I revise and revise until I drop the alpha, I'll trust it more.
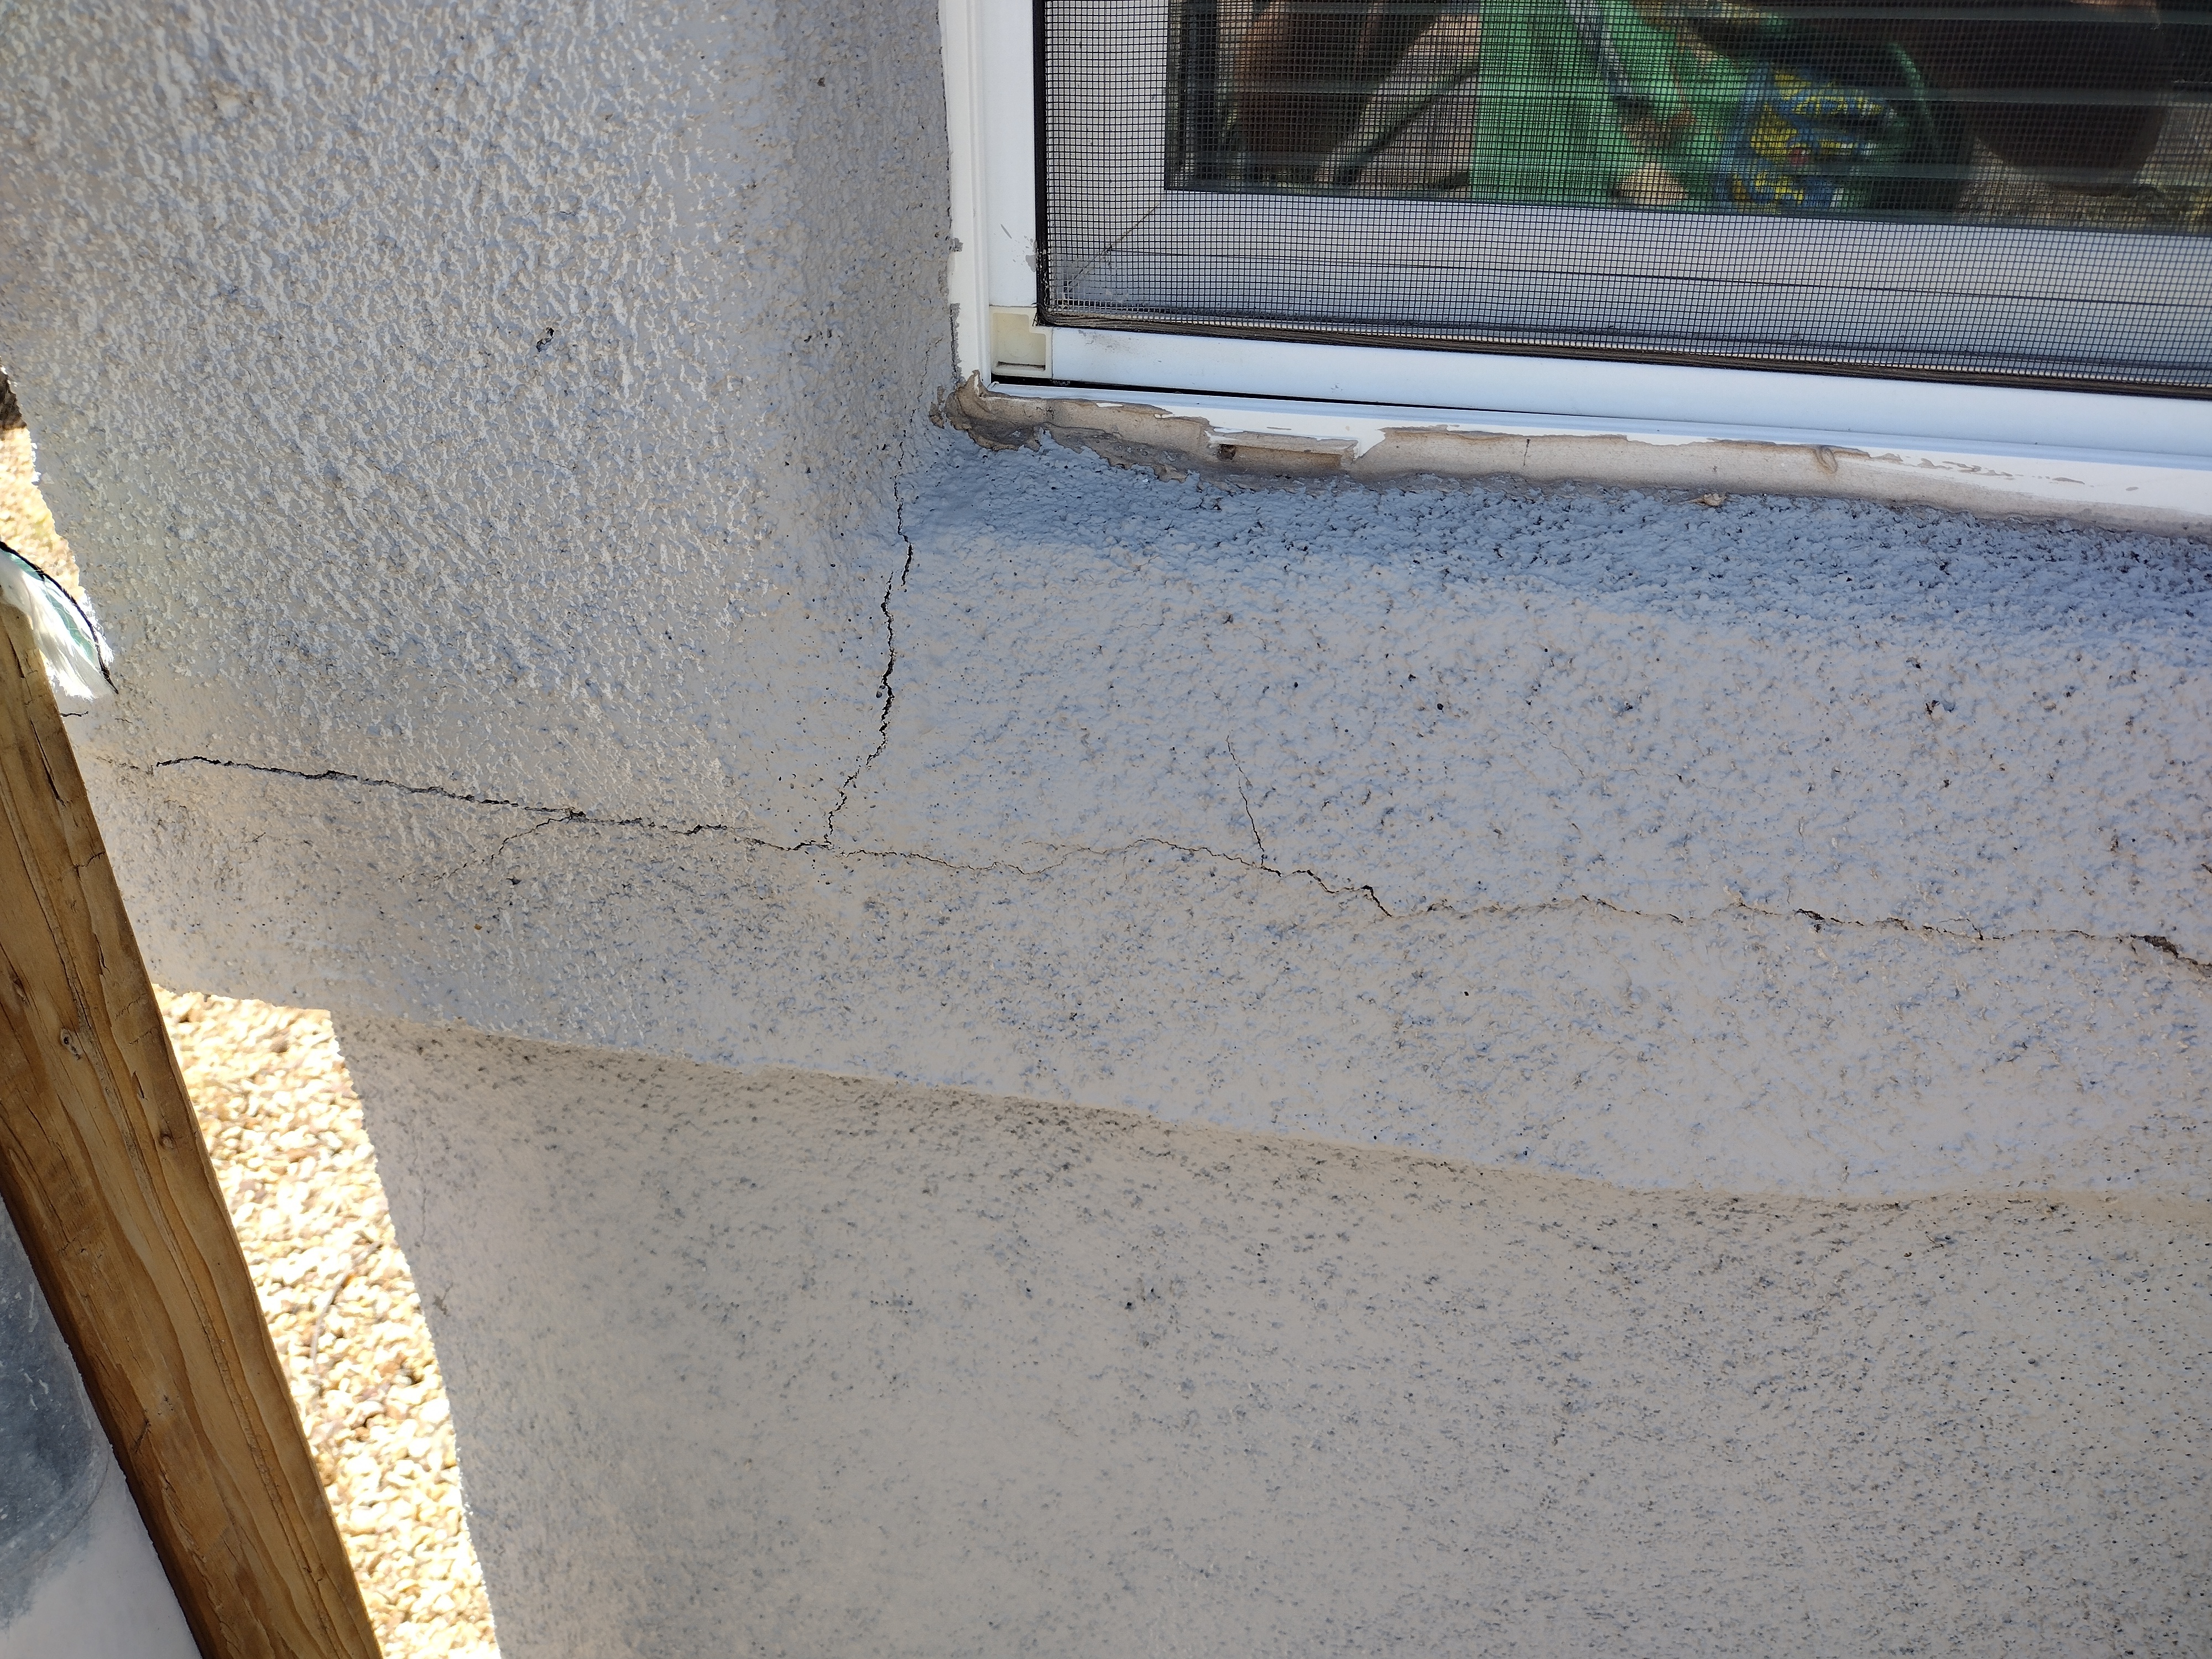
This was a push across the finish line. I optimized for getting something testable done with the correct topology, layout is a little dicey (cut off silk screen in the bottom right  ) and subject to change, I just needed something to test on. I was gone for over two weeks from my last post here, mainly because it was just a lot of work with nothing intermediate to report. But now it's here! This has all the working parts of the last boards merged into one, with the new additions of:
Oh, and I whipped up a cute lil logo. :3
schematics in here


board layout in here

board renders in here

I have a lot of really good work from y'all that I need to capture and incorporate. Particularly, my immediate plans while this board is fabricated and shipped are to:
The next post will be me building this out and reporting on how well (or whether) it works, and documenting changes for the Lite Alpha 2.
I also badly need to make a BOM. With some effort, anyone who's built a board together can buy all the parts for this and make one, but it'd be a thousand times easier if I just made a single cart that you can buy that includes every single component. If you want to make an alpha board for fun or debugging, maybe hold off until I have that out.
Honestly, those of you who are following this pretty closely have a good read on what's going on, what's needed, and what's upcoming - keep being interested! If anyone wants to make one, I do recommend waiting until I release a BOM, but very soon we miiight be at the point where other people besides me get one of these in their hands.
I could also use some polish on the logo. It's fine, but it could be cuter, and the lines are a bit funky. I'm going to put SVGs on git soon and if anyone feels like cleaning them up, rearrange the kitty cat face so it's cuter, fixing my wonky paths, let me know!
Also, and I simply cannot stress this enough - when I've been exhausted, when I've been deep in executive dysfunction, when I've been not feeling up for it, I've read through all your encouragement and support throughout the duration of this project and it's helped me to keep pushing. I would unquestionably not be this far without y'all. Thank you all so much.
As always, stop by, hang out, say hi, ask questions, tell me what you've been up to, design review me, however you'd like to be involved is good by me! I'm thinking I want to make the expected cadence of posts once every two weeks, just because I'm busy and I don't want to cause alarm when I miss a week. I can always surprise y'all with more frequent posts too.
P.S. - I have no hair regrowth in test areas.
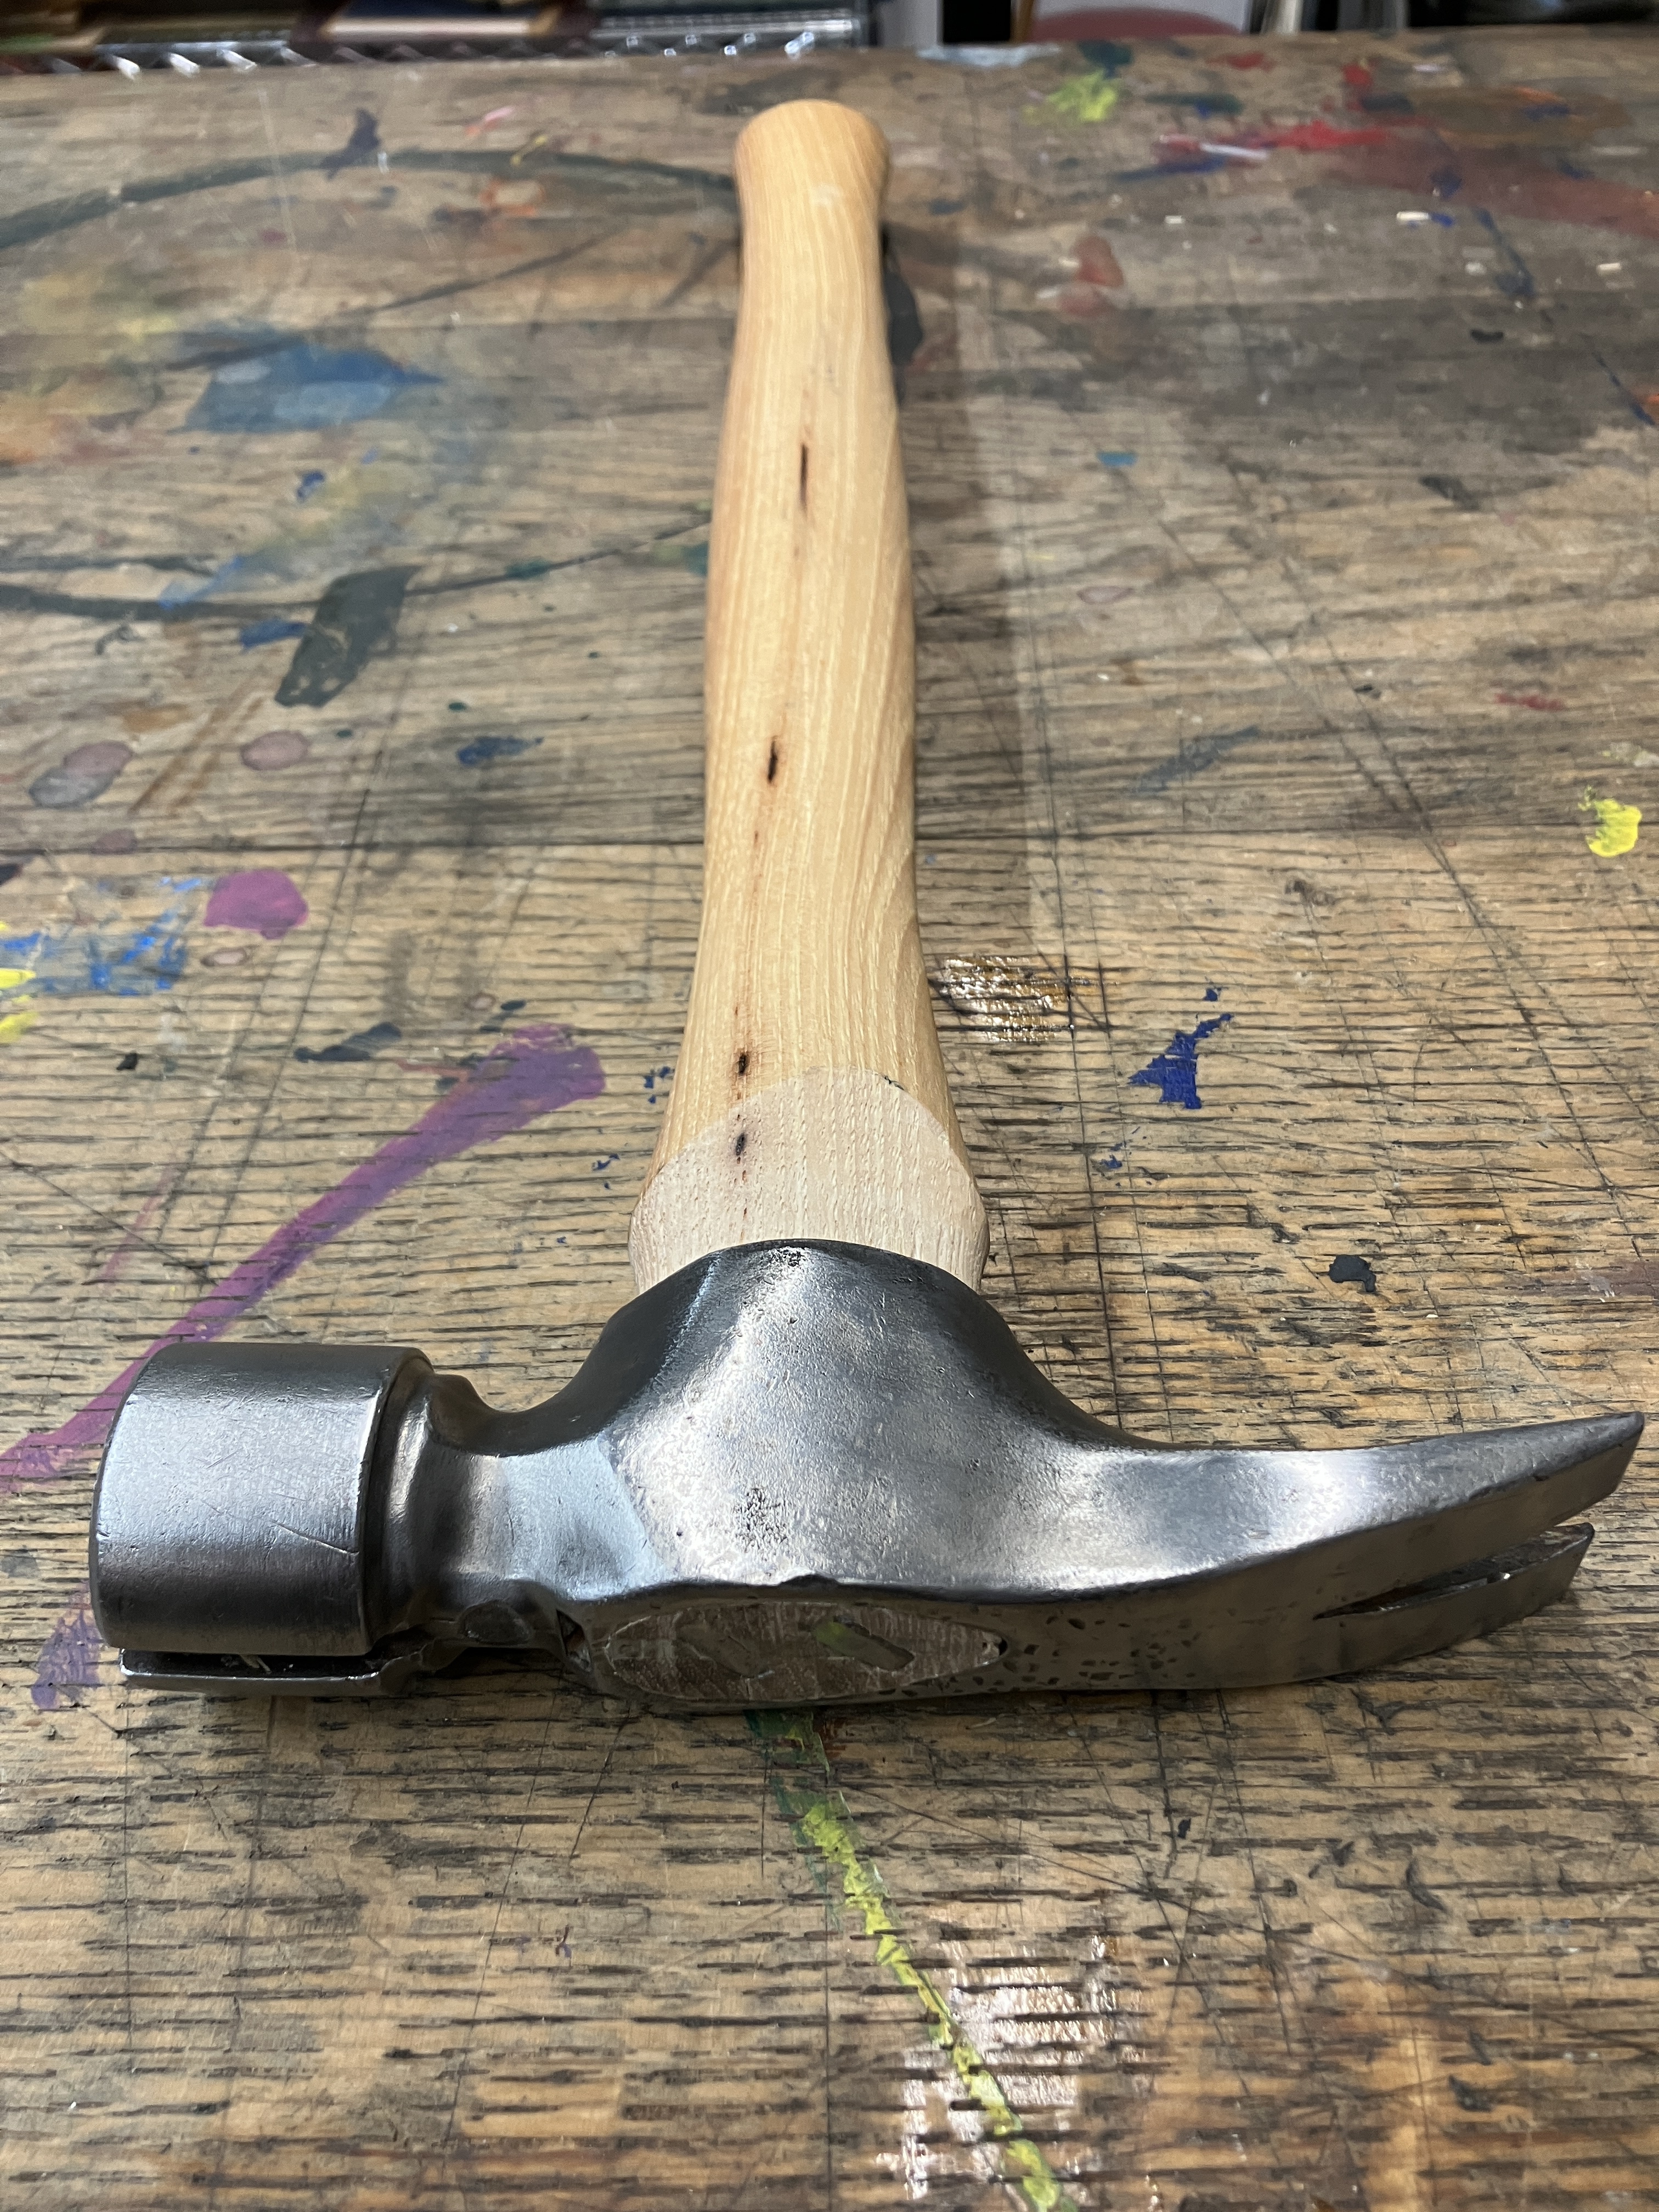
Scrounging through my dad’s cast off tools, found this framing hammer. As I was never really strong enough to swing a 24oz framer when I was a carpenter, I never bought one (I used a 16oz hammer with a long handle, because m*v^2). Now that I have no use for it and am even weaker, seemed like a good time to take it home and give it a new, coddled life. Replaced dad’s splintered and grey handle with a brand spanking new one.
Made of 10 awg copper wire and 18 awg silver plated wire. Copper work hardened more than I thought, wish I went with 12g instead, but it does make the final result sturdier.

The engineers asked me to bisect a part so they could inspect a couple welds. I NAILED it. A few hours later, they came back and asked if I could remove another slice at an angle because they thought the EDM wire might have been getting stuck in the cracks (this is not how EDM works, the wire NEVER touches the part, because if it does that means you get no sparks, and no cut... but regardless).
So here I am, the first cut was already diagonal so I could get both welds in one slice, now I'm fixturing this shit up on a sine plate, indicating the part to get it lined up again, trying to rotate a diagonal plane in 3D space and only give it a couple thousandths of an inch shave.
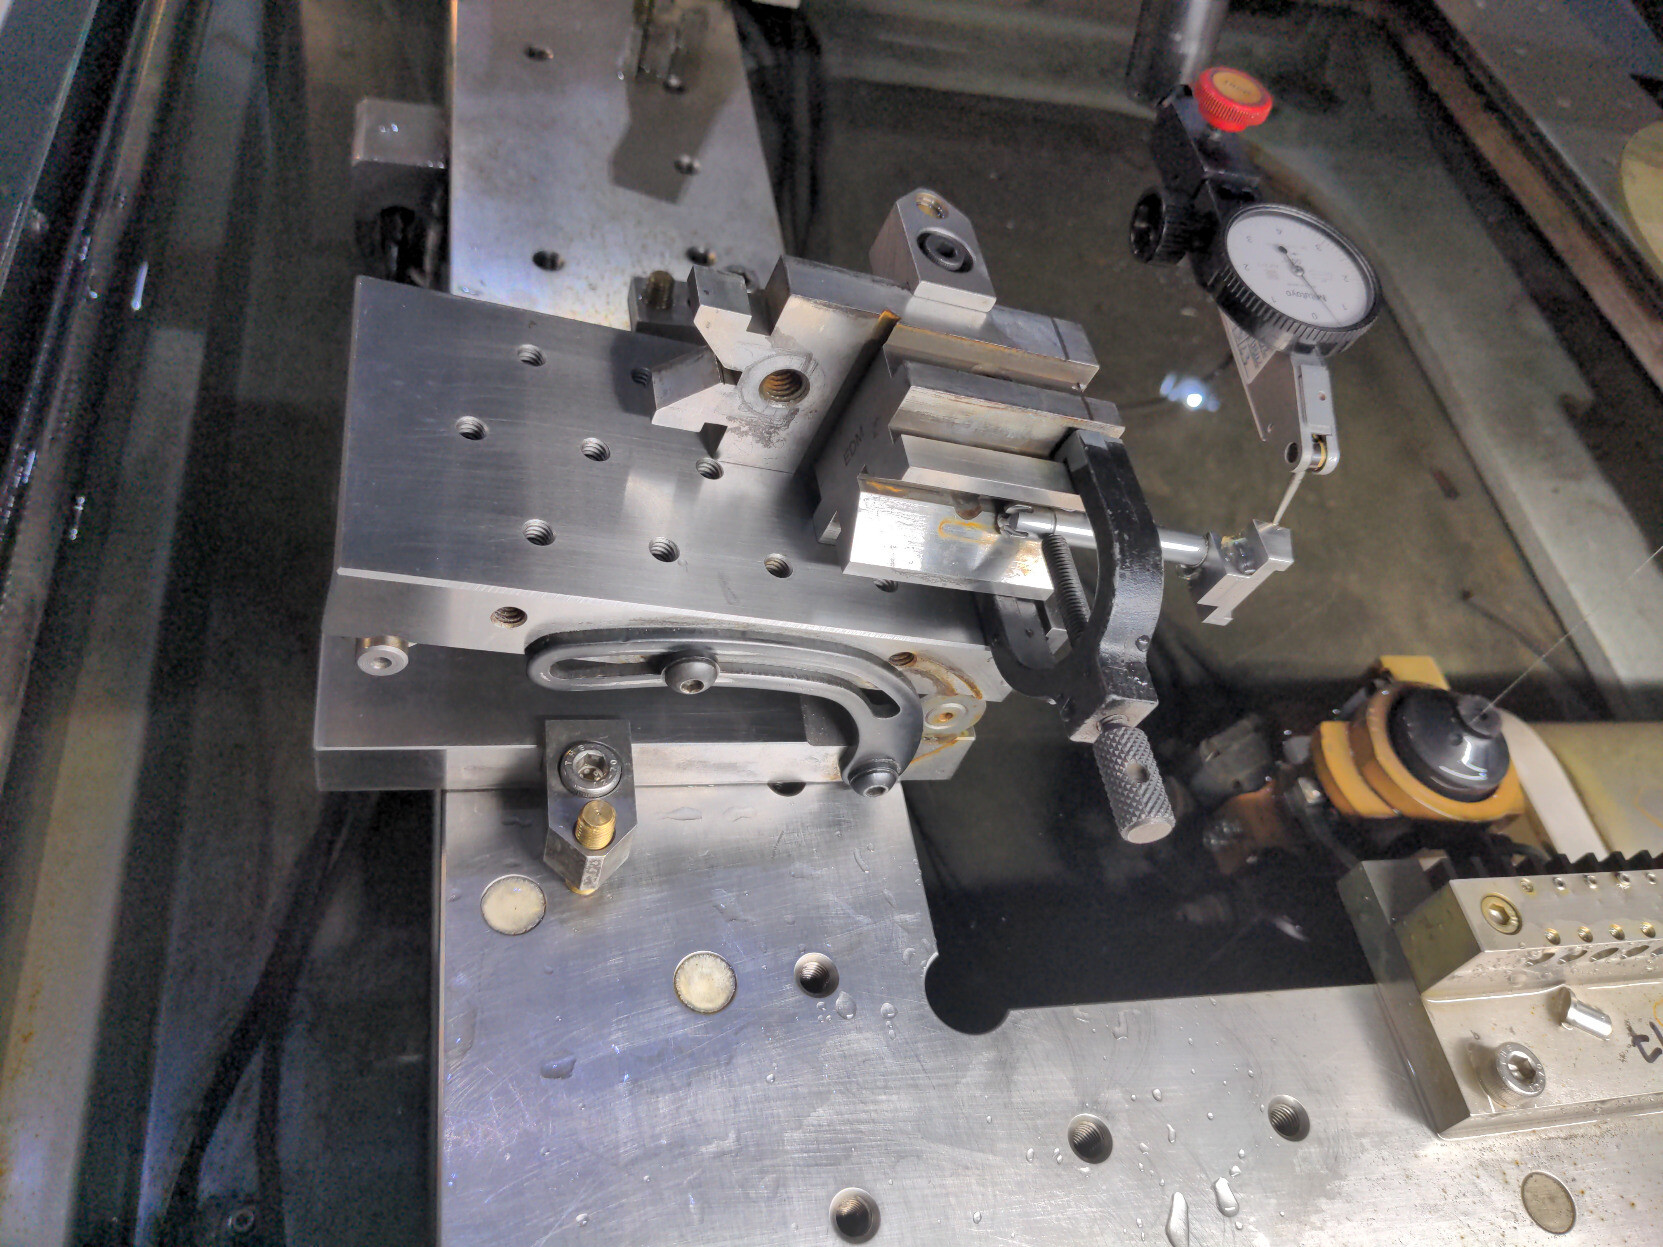
*Pictured: the original GIANT ENEMY CRAB and work in progress JACKALOPE *
I will be linking parts I use as examples. They are not necessarily recommendations for parts or suppliers, I just want you to see what I'm talking about.
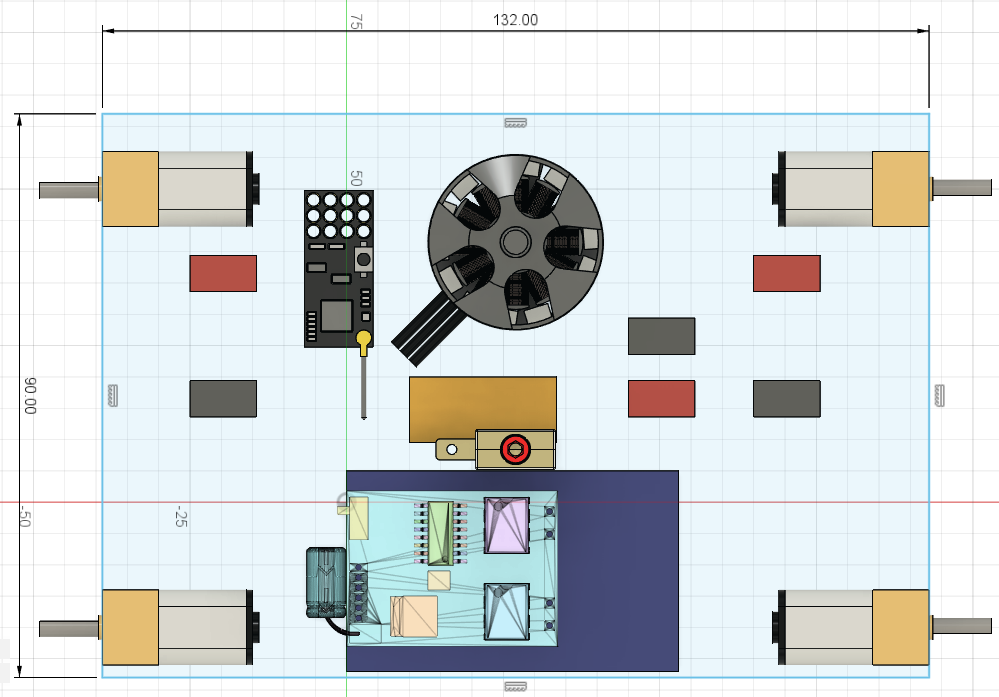
Hey sickos, spring_rabbit here, that weirdo who keeps posting about BattleBots. I thought this com could use some more long content, so I'm going to do a build blog of my next combat robot project here. In this post I will be introducing the GIANT ENEMY CRAB 2 project and talking a lil bit about the electronic components I will be using, and I will document future work on the robot as well to keep track of its progress.
PART 1: INTRODUCTION
In the winter of 2021 I finished building my first fully-functional combat robot, GIANT ENEMY CRAB. GEC is a 4 wheel drive robot with a horizontal spinning hammer up front, driven by a drone motor inside the chassis. It weighs just under 1 pound and uses simple 3d printed materials to comply with my local league's "Plastic Antweight" division. The chassis and weapon are made of PETG (one of the few materials allowed in the Plastic Antweight class), the tires are cheap foam wheels I found online, and it uses a hair tie for a weapon pulley belt. It's bulky, ugly, the wiring job sucks, and while the hammer could easily break your finger once spun up, it doesn't do a ton against similar opponents. But it was my first robot and that is something special.
Since last winter though, I've learned a lot. My other antweight JACKALOPE is coming along nicely and a quick glance shows how much more compact and efficient I can get with my designs. So with much more experience under my belt, I'm looking to build a new version of GIANT ENEMY CRAB, using better materials and more knowledgable design to make a much more competitive bot. Unlike the original, GEC2 will be made for the standard 1lb Antweight division, allowing much more flexibility in materials I can use, including engineering filaments and laser-cut metal parts. This is at the request of its future driver, who wants to compete alongside me in the more destructive 1lb weight class.
So what will make GEC2 a proper successor to the original GEC?
PART 2: ELECTRONICS
The electronics used in GEC2 will be the same as in the original GIANT ENEMY CRAB, save for some upgrades to the battery and power switch. This is because I bought multiples of each of the original components and don't want them to go to waste.
Like most small combat robots, GEC2's electric components will consist of a Battery, Brushed motors for drive, a Brushed Electronic Speed Controller (ESC) to control the drive motors, a Brushless motor for the weapon, a Brushless ESC for the weapon motor, a Receiver, and some switches and terminal blocks. Each of these parts are pretty typical for the weight class, but I will break each of them down here.
Battery - The original GEC used a 2S 300mah battery. It works, but that size of battery is more commonly used for 150g fairyweight/British antweight bots. I will be bumping it up to a 3S 450mah battery which is much more common for this weight class.
Drive Motors - Much like the original, GEC2 will be using 4 1000rpm N20 micro gearmotors to drive it. These are a little small for the weight class, but using 4 of them is enough to carry 1lb just fine.
Drive ESC - The big choice with drive ESCs is whether you want to have a separate ESC for each motor, or one that drives both of them. Dual ESCs are really convenient and cheap, but also bigger and thus a little harder to fit into your design. This is the one I use. In my experience it will run the 4 small motors just fine if I assign two motors per drive channel, and it has a similar footprint to the battery which makes designing an enclosure easier.
Weapon Motor - The weapon will be driven by a MT2204 drone motor. I don't actually like the mounting system on these and prefer a thinner shaft and top that you can screw into, but they come in sets of 4 and I've only used 2 so far. Next time I'm buying parts, it's something I will look out for.
Weapon ESC - The weapon motor will be driven by a 20A Brushless ESC. Again, these came in sets of 4 when I bought them, but unlike the motors I have no complaints. These make the motor go spinny!
Receiver - I like this receiver. I'ma be real, I don't know anything about receivers, but this one is compatible with my transmitter (controller) and has enough channels to run this bot so I see no need to change things up.
Switch/Terminal Blocks - In the original GEC I used a tiny spdt switch to power it on and off, and all of the wire connections are horrible tangles of badly-spliced wire. This time, I will be using a Fingertech switch, and terminal blocks for all 3-way connections. These are mostly for convenience sake as I don't think there is any reason I couldn't do things the old way. I just like these way more for ease of construction and repairability.
So nothing too special as far as electronics go. These are mostly just what I had on hand, and very typical of 1lb bots. Mostly the same as in the original GIANT ENEMY CRAB but with better battery, or like JACKALOPE with different drive motors. The real magic of bot building happens when you start to put a shell around it all...
NEXT: Let's open up Fusion 360 and build a first draft chassis!
update: the wiring diagram update 2: Preview for what I'm doing next

A few weeks ago I made a post about some basic sewing/mending skills and supplies so people could make their clothes last longer. I've been thinking about some things to write for Part 2, so here it is. As before, if other crafty people have more to add, please feel free!
@hotcouchguy asked about best practices/basic stuff that he missed while teaching himself how to sew, so I've been trying to think about stuff that you do without even really realizing you do it, and I thought of something that is really useful when you're hand sewing. I shared this link to show you guys how to backstitch, but I didn't point out something that she does in the video that is really useful, especially if you want to work quickly. You may have noticed that while she's sewing, she doesn't pull all the thread to the back, then pull all the thread to the front. Instead, she pushes her needle to the back and back to the front kind of in the same motion, which leaves most of her thread in the front. Then she pulls the whole thing through to the front again until her stiches are taut. Now, if you're new to sewing, it might seem a little tricky to send your needle to the back and back to the front again all in one motion like that, so you might want to break it up into two separate motions, which is fine! The one thing I would suggest though is to leave a loop of thread on the front. So you would send your needle to the back and pull through some of the thread, but leave some on the front still, then send your needle to the front and pull the whole thing taut. The reason for this is that it's easy for thread to get twisted up while you're working and make a little knot--these knots are often not very sturdy, so they come loose. If you've got a knot like that and it comes loose after you're done, all of a sudden your nice taut seam has turned into a loose mess. This leaves you needing to check the back constantly to make sure there aren't any sneaky little knots hiding back there, which is a pain. If you leave a loop on the front and then pull the whole thing taut, then you can see that there must not be a knot back there otherwise the front loop wouldn't move, so that way you're not constantly flipping your work to check the back. (I'm not sure if all this only makes sense to me because I know what I'm trying to say. Please let me know if any of that needs clarification. It's so much easier to just show people than try to talk through it!) If your thread does get twisted and makes a knot, usually pulling gently will untangle it. If it's being stubborn, insert your needle through the loop and pull away from the fabric and it should come undone. This video shows that method, and how to untwist your thread periodically by letting your needle dangle. She's embroidering, but it's the same idea. (Sorry, this video is a little cheesy. The methods are sound though!)
I also realized I didn't tell you guys the technique I use when using the backstitch to mend a hem that's come undone. It doesn't happen as often now, but for a while it seemed like every t-shirt I bought, the bottom hem would start to unravel after a few washes. This is what I did to fix it. Snip the loose threads off right next to the fabric so you don't have any tag ends hanging loose. Thread your needle, and start stitching about an inch from where the original stiches stop, stitching right over the machine stitches, using the same holes in the fabric. This is enough to hold them in place and keep the hem from unraveling more, even through many washings. Then keep backstitching through the area that came undone, and keep stitching over the stitches on the other side, again for about an inch. This is a good moment to point out that a stitch in time saves nine! The more quickly you do this, the less area you'll need to fix. You may still be able to see the holes for the original stitches too, which will help you keep your stitches uniform and help the whole thing blend in. If you've let things go, especially if you've washed the garment since it started to unravel, then you probably won't have that guidance any longer. If it's a big area, you might want to iron your hem so that you're not working to keep the hem straight. Some pins will help with that too. Then knot the thread (there's a section on that in Part 1). Note: Hems don't typically have a lot of pressure on them so in my experience, you don't need to bother with trying to knot off the machine stitches to keep them from unraveling. However, if it's a seam that's come undone--like if you've split the seat of your pants or something--there's going to be more pressure there. You might want to unravel enough of the machine stitches to have enough thread to work with to knot it, then mend the open part. I don't like trying to knot machine stiches though and I don't like unpicking stitches, so as I recall I've just backstitched farther over the machine stitches--like instead of 1 inch, 2 or 3 if it was an area that was going to be under pressure.
How to thread a needle: (How did I skip this before??? I mentioned using a needle threader if you're having trouble, but that's it. Whoops!) This is how I do it. She mentions that saliva is bad for your thread. True! (I have done it though.) There's also beeswax, which I linked to in Part 1 if you want to stiffen your thread and try to just push it through. I think the loop method above works pretty well though. If you want to cheat 😁 and use a needle threader, here's how to do it. (No shame, I have one and use it sometimes when I'm struggling for some reason.)
Fix a snag in a knit: This tool is a nifty little thing that you can use to grab a snag in a sweater and pull the loop to the back so it isn't visible. It's very easy to use! There's a little latch that goes over the hook so that the hook doesn't snag on the fabric when you pull it back through. Insert back to front, open the latch, put the loop you're trying to hide between the latch and the hook, close the latch, and pull back through. The snag is now inside the garment where nobody can see it. Oh, here's a video if that didn't make sense. She mentions that she uses the tool for other stuff while sewing, and I do too. It's a pretty useful little gadget! One thing I use it for is if I haven't quite left myself enough thread to bury the end (See Part 1 on knotting off your thread) because if you don't have at least the needle's length of working thread left, you can't bring the point of the needle back near enough to your knot to make it work. This video is the only thing I've found that kind of comes close to explaining what I'm talking about. She's finishing off embroidery, but you can see that she's "burying" thread in a similar way. Skip to 1:40.
Mending a hole in a t-shirt: I don't like iron-on patches and prefer to use a needle and thread to fix holes, but that's just me--plenty of people like iron-on just fine. This video is nice because it shows you several varieties of iron-on patches, as well as how to sew it shut or use fabric glue. Like I said, I prefer the sewn method that she shows here, but you can see the range and make your own choices.
I talked about how to sew on a button in Part 1, but I didn't say anything about what to do if you don't have the original button to sew back on or a handy replacement in the hem for you to use. When that happens, take the garment to your local fabric store and see what your options are. You may get lucky and be able to find something similar enough that nobody will ever know the difference. If that doesn't work, you have 2 options--you can cut off all the other buttons and replace them all (not my preference), or remove the top button from the garment and move it to the missing spot, and pick out a deliberately different button to put in the top spot, so it looks like a fashion choice and not a bad match (my preference--I am lazy and don't want to replace all the buttons, but I'm also a perfectionist so if the match isn't close enough to really satisfy me then it'll bother me forever and I won't want to wear the garment.)
OK, that's all I've thought of for now. If anyone has a project that they're not sure how to approach or something that needs to be mended that you're not sure how to fix, please feel free to ask and I'll do my best to help you out. I enjoy this stuff, so it's no bother! (Also if you'd like to get into embroidery or crochet and you're not sure where to start etc, I'd be happy to talk needlecrafts too!)
*The header image is the scissors case I made for my embroidery scissors last summer, because I'm pretty proud of it lol.

